RTally
-
Posts
79 -
Joined
-
Last visited
RTally's Achievements
")


-
Check out http://www.t-linespeakers.org/classics/dynaco.html The website has drawings for various Dynaco cabinets.
-
Where in the world / US are you located? if you are close enough, many (including myself) would prefer to pick up in person rather than ship. In many cases, speakers are too heavy and fragile to ship.
-
The cabinets for acoustic suspension speakers do not have a tight seal. If they did, the woofers would pump based on barometric pressure. There should be some leakage, although only a small amount. The technique I use is to depress the woofer cone and HOLD the depressed position for at least 5 seconds (preferably 10 seconds) before releasing. Holding the cone in allows the internal cabinet pressure to equalize with atmospheric pressure. If the cone is not depressed long enough, the compressed air does not have a chance to fully escape and will help push out the cone, giving a misleading result with a slightly faster return time. After releasing the cone, measure the time for the cone to return to its resting position. When I test KLH speakers, a return time of less than 1/2 second indicates that there is a leak somewhere. The quicker the return, the more likely the leak is too large. A return time around 1 second or more is optimum and indicates a good cabinet seal. I will let the AR experts advise on the optimum return times for AR speakers if the return time is different.
-
Need advice on identifying these Large Advents and path forward
RTally replied to Mr. Weather's topic in Advent
"Assume the capacitors should be replaced. My capacitor meter has been flakey so I don't trust it to give me an accurate reading." Those Temple caps have a reputation of failing, sometimes catastrophically. I would replace them with modern film caps. -
The technique I like to use requires a small Allen wrench (~1/16 inch will do) and a pair of vise grip pliers. The small end of the Allen wrench will easily pass through the weave of the grill cloth without damaging it. I find the openings in the grill frame, insert the Allen wrench through the cloth and move it so it is behind the grill frame, and then pull up with the vise grips. Be sure not to poke the surrounds when inserting the Allen wrench. Use a low, steady amount of force. I generally have to work my way around the frame several times until the adhesive weakens enough so that the frame starts lifting. I then use a ruler or putty knife under the grill frame after the frame lifts enough in one place to fit a rigid, flat implement. On some speakers, but not many, the Allen wrench is small enough to fit between the inside cabinet edge and the outside edge of the grill frame.
-
I prefer to use Aleenes Tacky Glue (a white PVA). It is readily available at craft and fabric stores, among many other places. I like that you have more than 30 seconds to position the surround (typically, Aleenes allows alignment for 5 minutes or more). The solvent-based adhesives cure quickly. I am slow and methodical in my work and I have little time to ensure proper foam positioning before the adhesive cures. The flexibility of the glue after curing is not important. Where the glue is placed is not subject to being flexed (better not be!). I have never had a bit of trouble using it to glue foam surrounds to bare metal baskets. Also, as with any adhesive, you want to only use as much as is necessary to avoid adding too much mass to the cone-surround edge. I prefer to use a tone to magnetically center the voice coil. I see no sense in removing a dust cap. It requires additional effort to remove and requires care and effort to replace. I also manually depress the cone to ensure the VC is centered. With Aleenes, I can do this at my leisure before it cures. Finally, it is easy to overthink these things. You are not installing surrounds like they would in a factory, with jigs and specially formulated adhesives, where fast curing is desirable for production. So don't lock yourself into doing assembly as the factory did if you do not have the same facilities available. I refoam my speakers on a table by hand. I use appropriate materials and techniques. If you are not sure or this is your first refoam, I suggest refoaming a sacrificial woofer such as a thrift store find. Nothing like some experience to learn the ins and outs of a task.
-
OK, I need to stop posting for a while. I keep writing 12 when I mean 23. I don't have any Model 12 speakers, but they are on my wish list. I do have Model 5 and 23, among others. I fixed my posts, but I am sure I am confusing the heck out of JKent with my original posts. Sorry JKent.
-
Here is a pic of my Model 23 woofer:

-
The definitive KLH driver page is at http://www.aphenos.net/electronics/speakers/klh/all_klh.htm I remember reading in other places that the Model 5 and 23 woofers are direct replacements.
-
The corrosion on the woofers likely contains cadmium, which is very toxic. Please take precautions to avoid inhaling any dust or particles. Some advocate wiping loose corrosion with damp cloths and then disposing the cloth as hazardous waste. If it was my woofers, I would consider painting over the corrosion to fix it in place. Then return them to service.
-
Those tops are not too bad. You have some stains, but they should come out. The cabinet finish is oil. I suggest first wiping the cabinets with mineral spirits to get the surface dirt off. Then you can apply some BarKeepers Friend (oxalic acid) to the dark water spots to remove them. Some suggest mixing the powder with denatured alcohol. Apply the wet mixture to the dark spots, let sit for a minute, and wipe off. If that does not do it, reapply and wait longer. If the color of the top no longer matches the sides, I suggest another application of mineral spirits to remove more of the old oil and dirt. If there are surface imperfections, you could use sandpaper, lightly. I would use 120 to 180 grit. Be careful not to sand heavily near the edges. I like to use Danish Oil, non-tinted to refinish my cabinets. Some like to use tinted Danish Oil, such as walnut. I prefer a lighter finish, but use the tinted if you want a darker finish. I like to apply the Danish oil, wait about 5 to 10 minutes, and then wipe off the excess oil with a paper towel, rubbing the wood so that there is no oil on the surface. I then let it dry for an hour or two. I do this 4 or 5 five times, stopping when the oil no longer soaks into the wood.
-
Oops. Typo. I have Model 23, not 12. I've been looking for Model 12, but no luck yet. I have not finished restoring the Model 5, 17, and my epoxied woofer Model 6 yet. I am really impressed with the Model 20. I power them with a Denon amp that has 200 wpc at 4 ohms. They compare very favorably with my newer Model 6, although the Model 6 goes deeper. This is not surprising because the 6 and 20 have the same type of tweeter, with the 6 having a larger cabinet. My Model 23 has been recapped, but the woofer has not yet been re-coated. Even still, it sounds fantastic. The Model 5 is still original with no restoration. It sounds good and I can only imagine how they will sound after being restored. All my KLH are keepers. I will have to do a proper comparison after I get them all restored.
-
My experience is that the KLH Six was always built to the published schematic. I have two pair of Six, one 17, one 20, one 5, and one 12. I have not found any deviation from the published schematics in parts values for the caps and resistors. I don't have any way to measure inductance, but that should never be an issue unless there is visible damage to the inductor. I disagree about the 2 uF caps not failing. They fail at about the same rate as the 8 uF cap. The 8 uF cap is in series wth the driver, so a failing cap will likely be very audible, particularly if the ESR increases, as those caps are known to do. Replacing the 8uf cap will often result in immediate sound improvement, but it is likely the 2 uF caps are still adversely impacting SQ, but to much lesser degree. The 2 uF caps are in series with resistors and that part of the crossover performs a shaping function. Because the caps are in parallel, a change in ESR will be limited by the resistor value, thereby limiting the attenuation from failing caps. If the 2 uF caps fail entirely or just drift, the only impact will be on the crossover frequency of the shaping circuit. Such changes are rarely audible and generally require test equipment to detect the change in FR. Bottom line, replace all caps and don't worry about it.
-
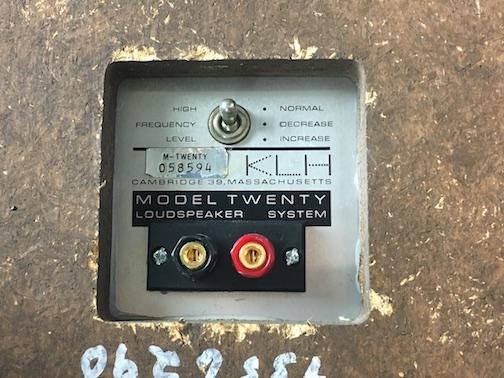
It looks like the yellow wires were moved to take the pots out of the circuit. Some do this because the pots are not working and they do not want to clean or replace the pots. Does it look like the center terminals were previously soldered? Check out the second post in this thread to see a schematic. Yours have two separate caps instead of the two-in-one-enclosure shown in the schematic. See also the third post in this thread:
-
Like JKent, I installed dual binding posts from Parts Express. I enlarged the holes to avoid shorting out the tabs extending inside the cabinet. The dual post came with a gasket to seal the cabinet. Also, like RoyC, I think the Model 20 are a fine performer. Placed side by side with my Model Six, I hear little difference. The Six goes deeper, but for most music, there is little difference. If I did not have the Model 6, I would be satisfied with the 20. Both sets are fully restored. I ran both the 20 and the 6 from a Denon POA-5200 amp (110 wpc @ 8 ohms). I have a pair of Model 17, but they are not yet restored so I cannot offer a comparison with the 17s, yet.