

kj2005
-
Posts
30 -
Joined
-
Last visited
Content Type
Profiles
Forums
Events
Posts posted by kj2005
-
-
Last info concerning LST-2 tweeters
Four tweeter coils repaired .....kapton coil forms hardened with thin layers of cyanoacrylate.... under 40x magnification by slit lamp (normally used for contactlens control)
2 tweeter plays ....
No. 3 & 4 mounted....litzewire still missing ......all 4 tweeter coils stays within Re 6 ~ 6,4 OhmLiquid rubber from ”Biltema” should be used to as minimal extent as possible because this "suspension" easily becomes less resilient than the original ”AR suspension”. The result is a lower sensitivity than the tweeter initially had.
After some experiments, the following came to suit subjectively ...... if possible: one could recommend a "half" drop of liquid rubber ( 3 x 2 mm) at the three fixing points on the metal faceplate and a suitable "thick / thin" mixed water-based contact glue as " suspension "between the three" rubber points ".
Without measuring equipment, is it not possible to determine whether the repaired tweeters has the same output as the originals?
Rgds. Kim


-
Well, after some challenges i have repaired one (1) out of four disconnected LST-2 tweeters. KlausM explained to me that the swedish car-store "Bil-tema" (car-tema) sold 15 grams liquid rubber for approx 7$...I bought this liqiud rubber that hardens within 12 hours ... it works with one drop on the three fix points on the tweeter frontplate to keep the voicecoil in place.
To recreate the softer "spider" suspension between the tree "dots", I used the water based contact glue from Audiofriends.nl. This glue is normally used for new woofer surrundings, but in this case you can make a thin layer first, and if coil moves too light it is possible give the coil edge one more thin layer .
To check the coil polarity you can check with a used 9VDC battery well down to approx 4,0VDC. Before centration and glue place the loose tweeter coil in the voicecoil -gap....if you connect the 4,0VDC battery to the the tweeter voicecoil with correct plus polarity, the coil will try to get out and away of the magnet-gap...easy test.
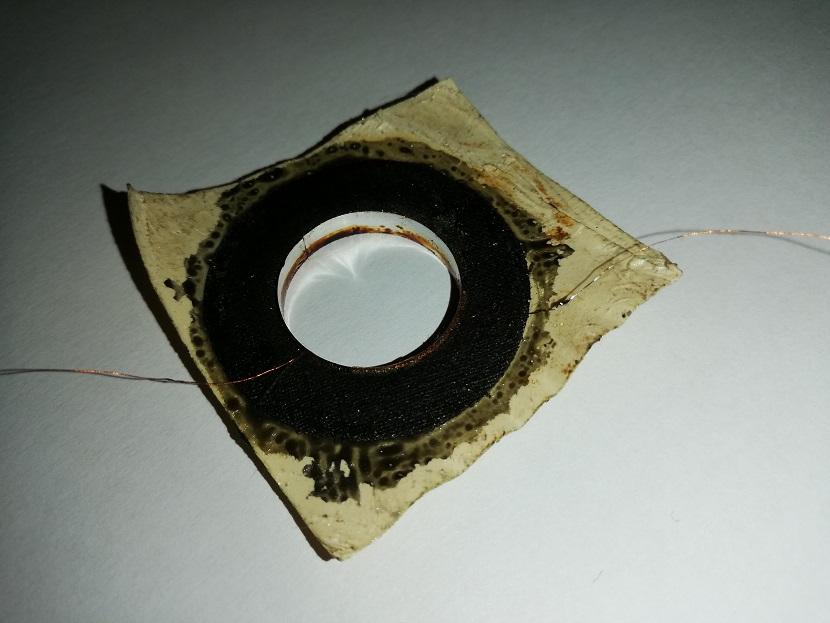
Less talk...here are the foto's
5-6mm paper arrows used for centration....clear tape used for isolation of the wires....voicecoil approx 6,4 Ohm DC resistance (test wires measures 0,3 Ohm)
Rgds kim


-
Thanks for all the good thoughts....I hope to get sound out of the tweeters, and today I have to buy some "liquid rubber on tube" that hardens in contact with oxygen.
Another thought was that many americans are very close to the "source" as far as 0,75" inch tweeter coils is concerned ! Look at this :
At AliExpress you can buy a lot of two inner coil diameter 19,43mm 5-8 Ohm tweeter coils silk-dome for 3,58$....looks like kapton coil form to me?
If the silk-dome does'nt fit you might be able to use the coil's? Anyone who tried this? rgds. Kim
-
Hi, I have erlier tried to repair the tweeter for AR10pi, and I was lucky because the wire breaking point (or heat-meltingpoint) was placed approx 1mm from the coil.
This type of repair with the old-style tweeter and the paper cone is more difficult..... but so far I have been able to get the disconnected coil out without doing any harm to the coil-shape.
I have drawn approx 3-4 cm out of the coil to find the melting point, and I found it....the coil measures 6,6 Ohm so it should be ok now.....First some pictures and explanation later.
I am not sure if this is going to be a succes..we'll see?
Rgds Kim


-
10 minutes ago, Glenn E said:
Very nice work. I have a tweeter out of AR93s (and other models) which needs fixing. I am inspired to have a go. Glenn
well nothing can go wrong with your tweeters because they are already to use as book supports or just for the trash can.....you can try to visit my amateursite for details, and feel free to ask if any questions occurs rgds Kim
-
Thanks for the roses. At first sight I would consider the 3a tweeters to be a bigger problem as far as repair is concerned. The 3a tweeter dome is made of some sort of paper-maché or compressed paper layers ( I don't know the correct word in english for "papmaché") and glued upon a coilform that looks like fenol-paper. I find it more difficult to separate the paper-dome from the very sensitive coilform on the 3a tweeter. I have tried once:-)
I am happy to know that we have some hifi people around with the same interest as me to keep the old midranges and tweeters going for the next decades to come? Edgar's invention....
-
4 hours ago, dxho said:
I think it's quite an accomplishment! Thank you for detailing the process. You might be the first
person, to my knowledge, who did so. I think a couple of reasons (and probably others, no doubt)
for no response: there is one person, maybe two, who are now offering repair services here, and
there's finally a reasonably close-in-sound aftermarket replacement available. Nevertheless, I
may finally drag out the dead tweeters I've been hanging onto for several years and see if they can
be revived.Hi Thanks. You may have a point with the aftermarket replacement tweeters like Hivi Q1R and similar, because it's less difficult to change the old tweeters with new types.
I have worked with magnifying glasses and lenses for low vision /weak sighted people for more than four decades, and I am used to work with microscope. With a wire thickness of only 0,1mm you need magnifying glasses to be able to clean off the isolation lacquer from the copper-wire when you are going to solder the two wire-endings together.
The best advice for us older people with projects like this: use maximum light led 10-13W = 100Watt = 1000 ~1250 Lumen ( 3000K warm white has the best relaxation for our (normal)eyes, red/green/blue rod and cones) Yellow becomes visible by a combination of red and green spectral colours fired from the second ganglion cell layer to the vision center in the back of the brain. 3000 Kelvin is ok.
This is important knowledge if one are about to choose light type. White light is has many different combinations taken out from visible spectrum (400nm ~ 70nm)... bit off topic
Take the magnifying glasses and focus on the incomming wires both plus and minus and see, whether you can locate the melting point on the wire...you need at least +6,00 ~ +8,00D in the glasses :-)) You need a scalpel to scratch the wire with!
-
Repair of AR dome tweeters? I thought this was a great issue to many AR11 and AR10pi owners, as direct replacement tweeters are not available any more and very hard to find.
... no comments...?
If one looks at Ebay for AR11/AR10pi tweeters prices has gone up for old used units, so why not try to repair the AR tweeters? Normally it's the wire path comming in towards the plus side of the coil that melts and disconnects.
Rgds. Kim
NB. I used the same method with paper-strips to center a AR11 woofer cone, where the original AR production "cut-off" of the aluminium tube-coil made some edges on the aluminium tube that scraped on the pole piece. I took a while to clean off the old woodring without doing any harm to the woofer spider.

-
The last action is to glue the dome-cap back in place. The original brown hard glue is replaced with a tiny amount of cyanacrylate, but in order to keep the dome-cap in centerposition I used just a few tiny drops of waterbased contact glue. When the contact glue after some time has hardened enough, then use the tooth-pin and some tiny drops of cyanacrylate on the edge of dome-cap and the alu-coil-form.
Then I could use some advice concerning the rubber-foam originally used by AR on the tweeter frontplate? What does the members use as replacement? thanks in advance
Rgds Kim

-
When the voicecoil is situated and back in place use a little amount of waterbased contact glue close to the edge of the magnet air gab ( but no glue on the pole piece)
I used several 6 mm wide paper strips formed like arrows in the air-gap in order to center the voice coil. AR used a tiny little amount of magnetic oil at the voice coil and the paper strips takes a small part of the oil away by doing this. But it's ok!
Make a pressure on the double-glue-tape so that the tape once again connects to the magnet coverplate. After this use two pieces of clear thin tape to isolate the two thin wires from the magnet coverplate. The voltage meter shows 4,1 Ohm . The test wires has 0,7 Ohm resistance so we have a standard 3,4 Ohm working voicecoil again ☺️ rgds kim

-
One important issue to take care of is the use of ultra-thin 2 seconds glue (cyanacrylate) on the edge of area where the spider is glued to the aluminium coil form. It was necessary to loosen the spider from the very thin (0,1mm) alu coil mold in order to be able to draw approx. 1,2 cm out from existing cobber vindings on the coil. Don't loosen the spider all the way round but only enough to be able to draw a short peace of the wire out.
The old brown glue AR used that kept the spider in place was a very hard type of glue. I thought that cyancrylate could do the job as well. I used a tooth-plastic-pin to get the right amount of glue in place. See the marks where to add the cyanacrylate at the purple circle...and the soldering at the red circle.

-
The AR10pi tweeter: The inner diameter of the aluminum coil mold is 1,945 cm or approx 0,765748 inch ? and I have measured the wire thickness to 0,1 mm ..... the thickness of the coil mold is 0,1 mm. I have measured the DC resistance to 3,4 Ohm ..It should be possible to get someone to wind new coils for old magnet units? rgds Kim
-
I have just changed the address to my new amateur site.
Profile shows my website , URL.
-
I have with success been able to repair one tweeter where the incomming wire from the plus side was disconnected.
Before I delete some of the pictures please find the tweeter repair at a amateursite I am about to make. Under my profile you can find my website , URL
regards
Kim Hansen


AR LST-2 tweeter repair feb. 2020
in Acoustic Research
Posted
Wood repair and finish test....They sound great by use of a complete renovated NAD 3080?
My friend was very happy with the sound. In his opinion they were back to factory standard?
Rgds